

The vertical leg press is a rare machine even in commercial gyms, not to mention at home.
So let’s look at how you can make one at home or what you can substitute so the effect on the muscles is very similar.
First, key differences from the more common 45° leg press:
- Fully horizontal back position removes load from the lower back and neck
- Maximally direct resistance for the legs
- Greater activation of the quadriceps
- With proper technique there is no vertical load on the spine
Problem: Factory-made vertical presses are expensive, and DIY options are almost non-existent due to the complexity of the design.
Option 1: Heavy resistance bands (recommended)
What you’ll need:
- Resistance bands with 30–70 kg resistance (2–4 bands)
- Gym mat
- Pull-up bar, beam, or a ceiling hook
How to perform:
- Lie on your back under the pull-up bar/beam
- Attach the band to the bar above your head
- Secure the other end of the band to your feet (you can wrap it around or use special foot loops)
- Bend your legs, feet pointing upwards
- Press your legs vertically upward, stretching the band
Advantages:
- Low cost
- Completely safe — nothing can crush you
- Progressive resistance (the higher you press, the harder it gets)
- Compact and portable
- You can adjust the load by changing the number of bands or their initial tension
Disadvantages:
- Maximum equivalent load around 60–80 kg
- Unfamiliar sensations compared to free weights
- Requires an anchor point either above your head or below you
Lifehack: Use 2–3 bands at once and pre-tension them — this gives you load already at the start of the movement.
Option 2: Wall leg press with ankle weights
What you’ll need:
- A wall
- Ankle weights (5–10 kg each)
How to perform:
- Lie close to the wall with your glutes almost touching it
- Raise your legs vertically, feet on the wall
- Put on ankle weights
- Perform presses by bending and extending the legs
Advantages:
- No special equipment needed
- Truly vertical movement
Disadvantages:
- Weight limitation (maximum about 20–30 kg total)
- Relatively light load
- Difficult to progressively overload
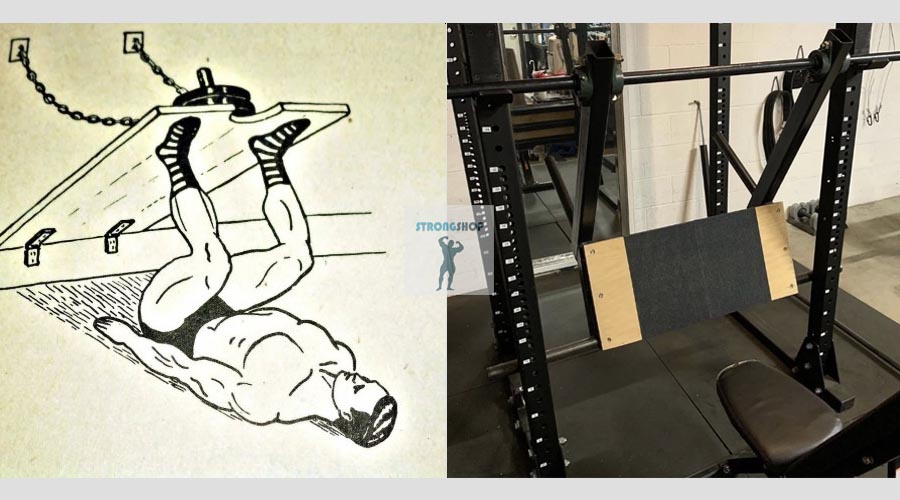
Option 3: Simple homemade construction (photo on the left)
What you’ll need
- A large and sturdy platform with an attached sleeve/rod for weight plates.
- Chains for attaching it to the wall.
- Loops underneath that fasten the construction.
How to perform:
Put the plates on
Lie down and press
Advantages:
Simple retro-style construction
Disadvantages:
- Although it’s not hard to make, it will take some tinkering
- Lacks mobility — takes up space.
Option 4 Hanging attachment for a power rack or stands (photo on the right)
The idea here is to use the bar mounting points in a power rack and have the attachment pivot on them.
What you’ll need
A power rack or advanced squat stands that accept a bar. This serves as the base.
Material to build the leg-attachment — for the frame use metal (square tubing, approximately 40 x 40), and for the surface a thick sheet of wood.
Also a round tube for the weight plates and for mounting on the uprights.
How to perform
Install the attachment in the rack, load the plates and press away from yourself
Advantages
You use existing equipment as a base
Relatively simple to manufacture
Disadvantages
The range of motion is more from you outward rather than strictly bottom-to-top.
There is no rigid fastening of the attachment itself — it simply rests on the hooks.
Option 5: Homemade tube-based construction (for advanced users)
Attention: This is a complex project requiring welding or metalworking skills. It’s better to sketch it out and order welding from a specialist. That will be more reliable.
What you’ll need:
- Square tubing about 50x50 mm or 60x40 mm
- Guides (you can use smooth tubes or linear bearings)
- Foot platform (15 mm plywood + covering)
- A system to attach the load above the platform
- Travel limiters
Concept:
- Vertical frame 2–2.5 meters high
- Movable platform on guides
- Bench at the bottom
- Weight attaches to the platform from above
Advantages:
- Real machine
- Can load 100+ kg
- Accurate imitation of a factory version
Disadvantages:
- You’ll have to spend money on materials
- Requires welding and skills
- Long build time
- Takes a lot of space (minimum 2x1 meters of floor area, height 2.5 m)
- Safety risk — if the structure is not well thought out, the weight can fall on you
Why it’s rarely made: Due to the height of the structure, difficulty in creating smooth guides, and safety issues.
here is another design described here - https://hugeman.ru/trenazher-dlya-zhima-nogami-2/
Option 6: Adapting a Smith machine
If you have a Smith Machine:
What you’ll need:
- Smith Machine
- Soft pad on the bar
- Mat
How to perform:
- Set the Smith bar at the lowest height
- Place a platform on the bar
- Lie under the bar so your feet press against the soft pad from below
- Unlock the bar and perform leg presses upward
Advantages:
- Safe (safety hooks available)
- Stable trajectory
- Can be loaded with plates
Disadvantages:
- Requires a Smith Machine
- Limited range of motion, though this depends on the Smith model
Option 7: using a leg attachment
What you’ll need:
A universal bench with a leg attachment that allows leg extensions seated and leg curls lying.
Blocks or something similar to put under the bench’s front leg (to increase height)
How to perform:
Raise the bench height
Prepare the attachment, load it with plates.
Lie as close as possible to the attachment and press your feet against the top rollers (the ones for curls)
And now simply perform the press.
Advantages:
No need to invent anything, we use a ready-made attachment. Simple and elegant))
Accessible. A bench with a leg attachment is a versatile machine that, unlike a Smith, is often bought for a home gym. So you can just adapt it.
Quite safe, the weight is not over you.
Disadvantages:
The movement is not fully vertical, but partially away from the body.
Alternatives to the vertical leg press
If creating a full vertical leg press is impossible:
For quadriceps:
- Sissy squats
- Hack machine squats
- Seated leg extensions
For overall leg work:
- 45° leg press (if available)
- Barbell squats with a safety squat bar (SSB)
- Bulgarian split squats with emphasis on the front leg
Conclusions
Realistic options for home use:
- ✅ Resistance bands — best ratio of effectiveness/cost/safety
- ✅ Wall + ankle weights — for beginners on a small budget
- ⚠️Leg attachment and bench — an interesting compromise
- ⚠️ Homemade frame — only if you have construction experience and a clear understanding of safety
Not recommended:
- Amateur wooden constructions without engineering calculations
- Attempts to improvise with heavy objects over your body
Safety matters
With any option that has weight over you:
- Always use stops/limiters
- Start with minimal weight
- Check all fastenings before each set
- Train with a partner when possible
- If the construction raises doubts — don’t use it
The vertical leg press is an excellent exercise, but it’s not so unique that you should risk safety to imitate it. Resistance bands will give you 80% of the benefit with minimal risk!
And if you really want the actual machine — it’s better to adapt a Smith or a bench with a leg attachment. If you’re going to build one from scratch, don’t rush, think through all details and consult a good welder. It’s expensive, of course, but the result will be higher quality and safer.