

Upper and lower block trainers are very popular and essential fitness equipment.
However, not everyone has the opportunity to set up a fully-equipped home gym with all the necessary machines.
Even in a large room, it might be impossible to fit everything. You have to think about what is truly fundamental for your training and irreplaceable, and what can be substituted with alternatives.
This especially applies to block trainers.
The upper and lower block trainers are undoubtedly an important part of strength training, allowing you to target your back and arm muscles.
But honestly, on block machines, you mainly perform isolated exercises, which are not foundational. Therefore, the question of buying one shouldn’t be too pressing. Alternatives are available.
Let’s now explore how to replace these rather bulky upper and lower block trainers at home.
This can generally be done in two ways:
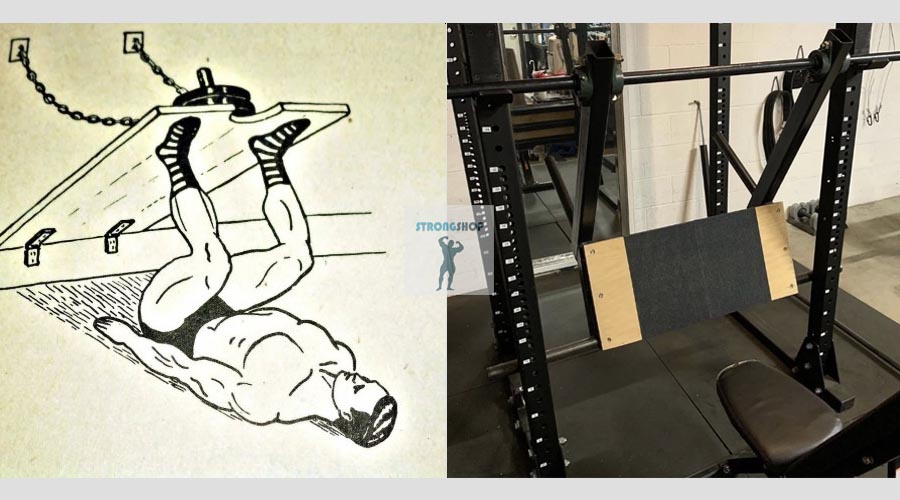
1. Using improvised materials to create a simple upper block trainer
Materials:
- Base: A sturdy door frame, wall, or any other reliable support that can handle your working weight.
- Cable or Rope: It’s better to use a metal cable since it can withstand more weight. The cable length should be sufficient to perform exercises with a comfortable range of motion.
- Pulley with Bearings: Choose a pulley with a hole diameter that matches the cable and has sufficient load capacity. Bearings are optional, but they reduce friction and noise.
- Large Hook: The plates will be attached to this.
- Handle: The handle should comfortably fit in your hand and offer a secure grip. You’ll also need a carabiner to easily attach the handle to the cable, or you can directly connect the handle to the cable without a carabiner for simplicity.
- Fasteners: Depending on your chosen support, you might need hooks, bolts, nuts, washers, and other fasteners.
Assembly Step-by-Step:
- Cut the cable to the needed length.
- Secure the pulley at an appropriate height.
- Thread the cable through the pulley.
- Fix the lower part to the hook.
- Create a loop at the upper end and attach a carabiner.
- Attach the handle to the carabiner (the handle should have a loop).
A crucial point: The lower part of your setup, where the weight hook is, should have support, such as the floor. Otherwise, without support, the weight could pull the cable down.
Make sure both the pulley and cable attachments are highly secure!
Use your ingenuity and fastening tools (e.g., staples, hooks, bolts, nuts, washers) to ensure reliable connections.
Once you’ve completed these steps, everything should be ready. Now you can attach a test weight to the lower part of your device.
Exercise Options:
- Pull-down to the chest.
- Pull-down behind the neck.
- Tricep extensions with a straight or reverse grip.
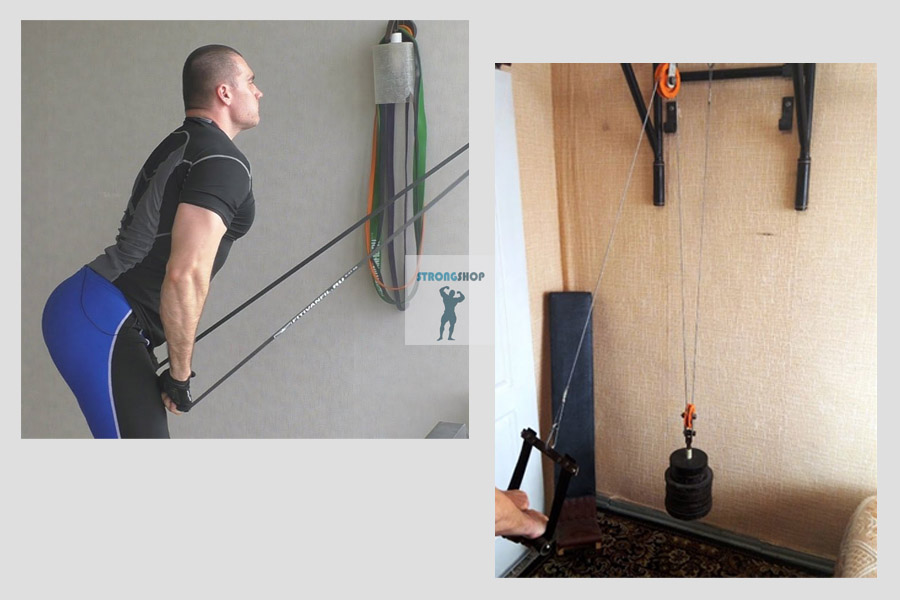
2. Using resistance bands to simulate both the upper and lower block trainers:
Resistance bands are a versatile training tool that can be an excellent alternative to a block trainer. Choose bands with suitable resistance and anchor them to a support (e.g., a table leg or door handle).
Materials:
- Base: A Swedish wall, sturdy bar, or other gym equipment.
- Resistance bands with varying resistance levels.
- Handle: The same requirements as in the first option.
- Carabiner for easy attachment of the band (if there’s no bar or wall).
- Hook for upper attachment (if there’s no bar or wall).
Assembly without a Bar: For the upper block simulation:
- Secure the hook at the required height (measure it beforehand).
- Take a test band.
- Attach a carabiner to the band and then to the hook.
- Attach the handle to the other end of the band.
Assembly for the Lower Block Simulation:
This is much simpler—you don’t necessarily need a hook or carabiner. Just loop the band around any stable object at eye level when seated on a chair or the floor.
The other end is traditionally attached to the handle, though sometimes the band can be held without one. Resistance bands are generally easy to grip.
If that’s not feasible, anchor the setup as described earlier—hook in the wall and attach the band via a carabiner, but at a lower height.
For lower pulls, you can sometimes make it even simpler—hook the band around your feet. However, this is more suitable for beginners.
And your lower block setup is ready.
Exercise Options:
For the upper setup, you can perform pull-downs to the chest, behind the neck, and tricep extensions.
For the lower setup, you can perform seated rows with various grips.
Advantages at a Glance:
- Affordability: No need to buy expensive equipment.
- Simplicity: Easy to set up.
- Versatility: Allows for a variety of exercises.
- Compactness: Doesn’t take up much space.
Conclusion:
Which setup to choose is up to you. You can even make both options.
Choose your resistance wisely, gradually increasing it as you progress.
Ensure proper exercise technique to avoid injury.
Don’t be afraid to experiment and try new exercises.
Remember, even at home, you can maintain excellent fitness using simple and accessible methods.